
Calling all Canva lovers! Hang on to your hats because we’ve got some great Canva secrets to share with you. In this step-by-step tutorial, we’ll show you some AMAZING Canva features to take your creations to the next level! From templates to keyword searches, to special effects and video tools, this show has it all!
To learn more about our marketing services, visit: https://fusiononemarketing.com/
Facebook: https://facebook.com/fusiononemarketing
LinkedIn: https://linkedin.com/company/fusion-one-marketing/
Instagram: https://instagram.com/fusiononemarketing
Twitter: https://twitter.com/fusiononeteam
Read the Full Discussion Below
Sarah: Hey, you’re not Glyna!
Kelsi: Nope.
Sarah: I’m really, really excited about this show. And I always laugh because I say that all the time, but I for sure am excited because this show is for all the Canva lovers. You and I are Canva lovers, Canva-holics, maybe. And so this is going to be the show for anybody who loves Canva because I’ve got so many cool features to show you today, Kelsi and I both, that you may not even be aware of. And by the end of this show, we’re going to give you through tutorials, videos, screenshots, you name it, we’re going to give you some really cool stuff to learn that you can use to up your game in the Canva world, so let’s get going.
Kelsi: Good morning, everybody. Welcome to Marketing Mix. As Sarah said, I am not Glyna. I’m Kelsi. Glyna had a well-deserved day off today from Marketing Mix. I know she’s watching and probably judging, but not too hard. I have big shoes to fill. But welcome to Marketing Mix, everybody. We do go live every week to highlight all kinds of different digital marketing topics. We like to mix it up with tips, trends, Q and A. So, let’s remind everybody where you can find our broadcast.
Sarah: You got it. All right. Every week, we go live on Facebook, YouTube, Twitter, and LinkedIn. And you can catch the replay on Instagram. And don’t forget about our podcast, Marketing and a Mic. And always, subscribe to our YouTube channel because every week, what we put out here, we are putting on the YouTube channel, and it’s all just giving you a bunch of free resources. You and I were talking about this yesterday, Kelsi, of how Canva’s constantly making updates. And the thing about it, which is it’s so great for all of us, but they don’t necessarily make announcements, so you can easily miss some of this stuff. And I think that’s part of the purpose of this, is there’s a lot of stuff that’s readily available that you may not even know about.
Kelsi: Exactly.
Sarah: So, we’re going to jump right in. And I’ve got a combination of videos and screenshots and all this kind of good stuff to show you. So the first thing we’re going to talk about as you knock us off is the Canva keyword search.
Kelsi: All right. So as Sarah said, they don’t typically come out and just blast their updates. And all the Canva users out there, I’m sure you can relate. There are times we’re working on projects and we’re just spinning our wheels, searching and searching for the right photo, or graphic, or template. So all of these things we’re going to walk through today are going to help you save time on those things. And the first thing we want to talk about is Canva keyword searches. So, we’ve got some secret keywords that we want to share with you to help you speed up the process and find the right thing for your Canva.

Sarah: Yes. Okay, so this is where you’re going to find this. So when you go into your Canva, and you open up a blank Canva, you’re going to find this in the photo section. So this is in photos, and what we love about this is, these are ready-made types of photos that you can use as-is. So let me show you what I’m talking about, the first one. Did you know if you just search in keywords under photos, PNG, all kinds of cutout transparent background photos are going to pop up for you at your disposal? Because how many times in the past will we look for stuff, and we’d be like, “I need to find one without a background. I need to find one without a background”? So this, you can plug in just PNG in your search, or you can plug in PNG truck, or PNG house, or PNG coffee cup, whatever it is. And it’s only going to show you a cutout image, not with the background. So, it’s such a time-saving feature and we love it.

Kelsi: It really is. I have spent so much time finding the right image that I can remove the background. So when you told me about this feature, it blew my mind that it’s that easy. Just type in “PNG”.
Sarah: I’m all about blowing your mind.
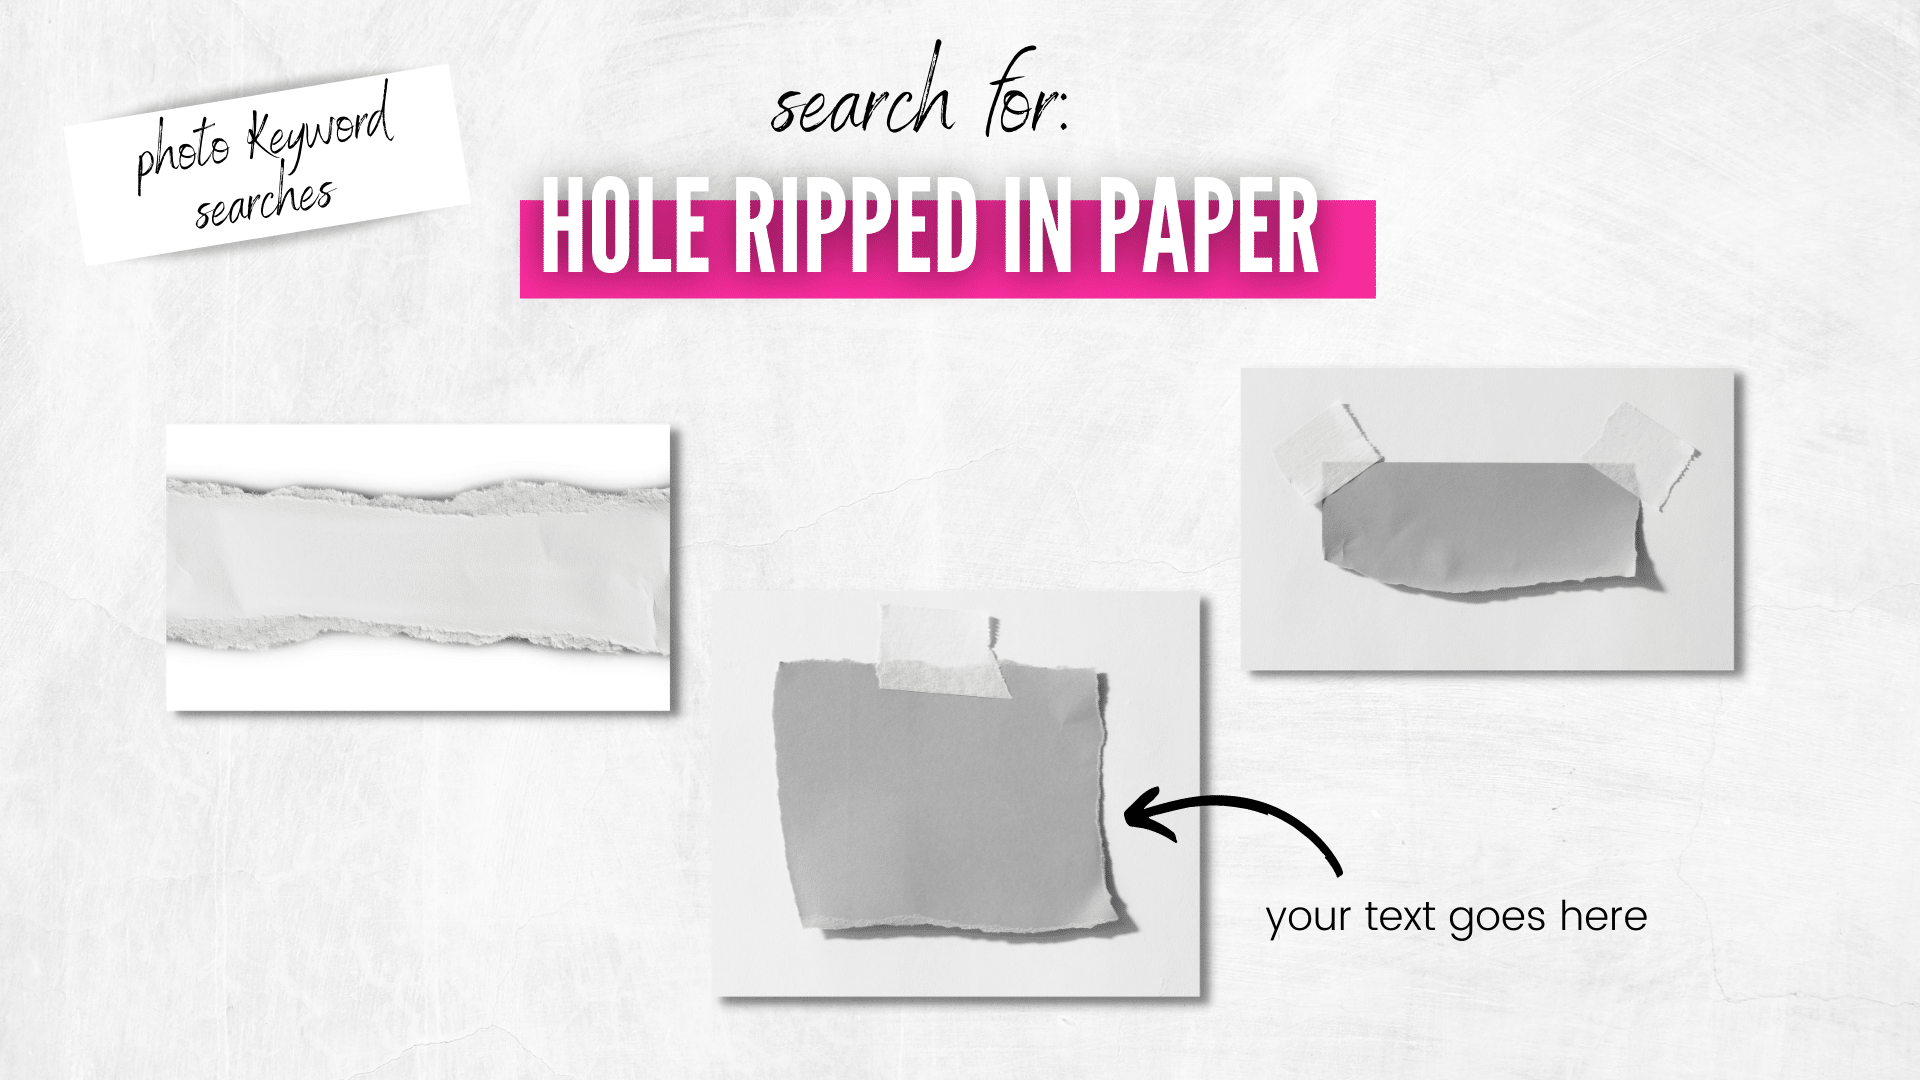
Kelsi: It’s so helpful! So another one that we want to share is a ready-made type image that has a space for some text. So if you use the keyword “hole ripped in paper”, you’re going to get these great options of torn paper, which gives it a real homemade feel, and it kind of takes it away from that general graphic design type feeling. So “hole ripped in paper” is going to help you find these types of items to include in your projects. As I said, they’re great for just adding, dropping text on that paper. You can do a cool quote, inspirational quote, or a reminder for your audience.
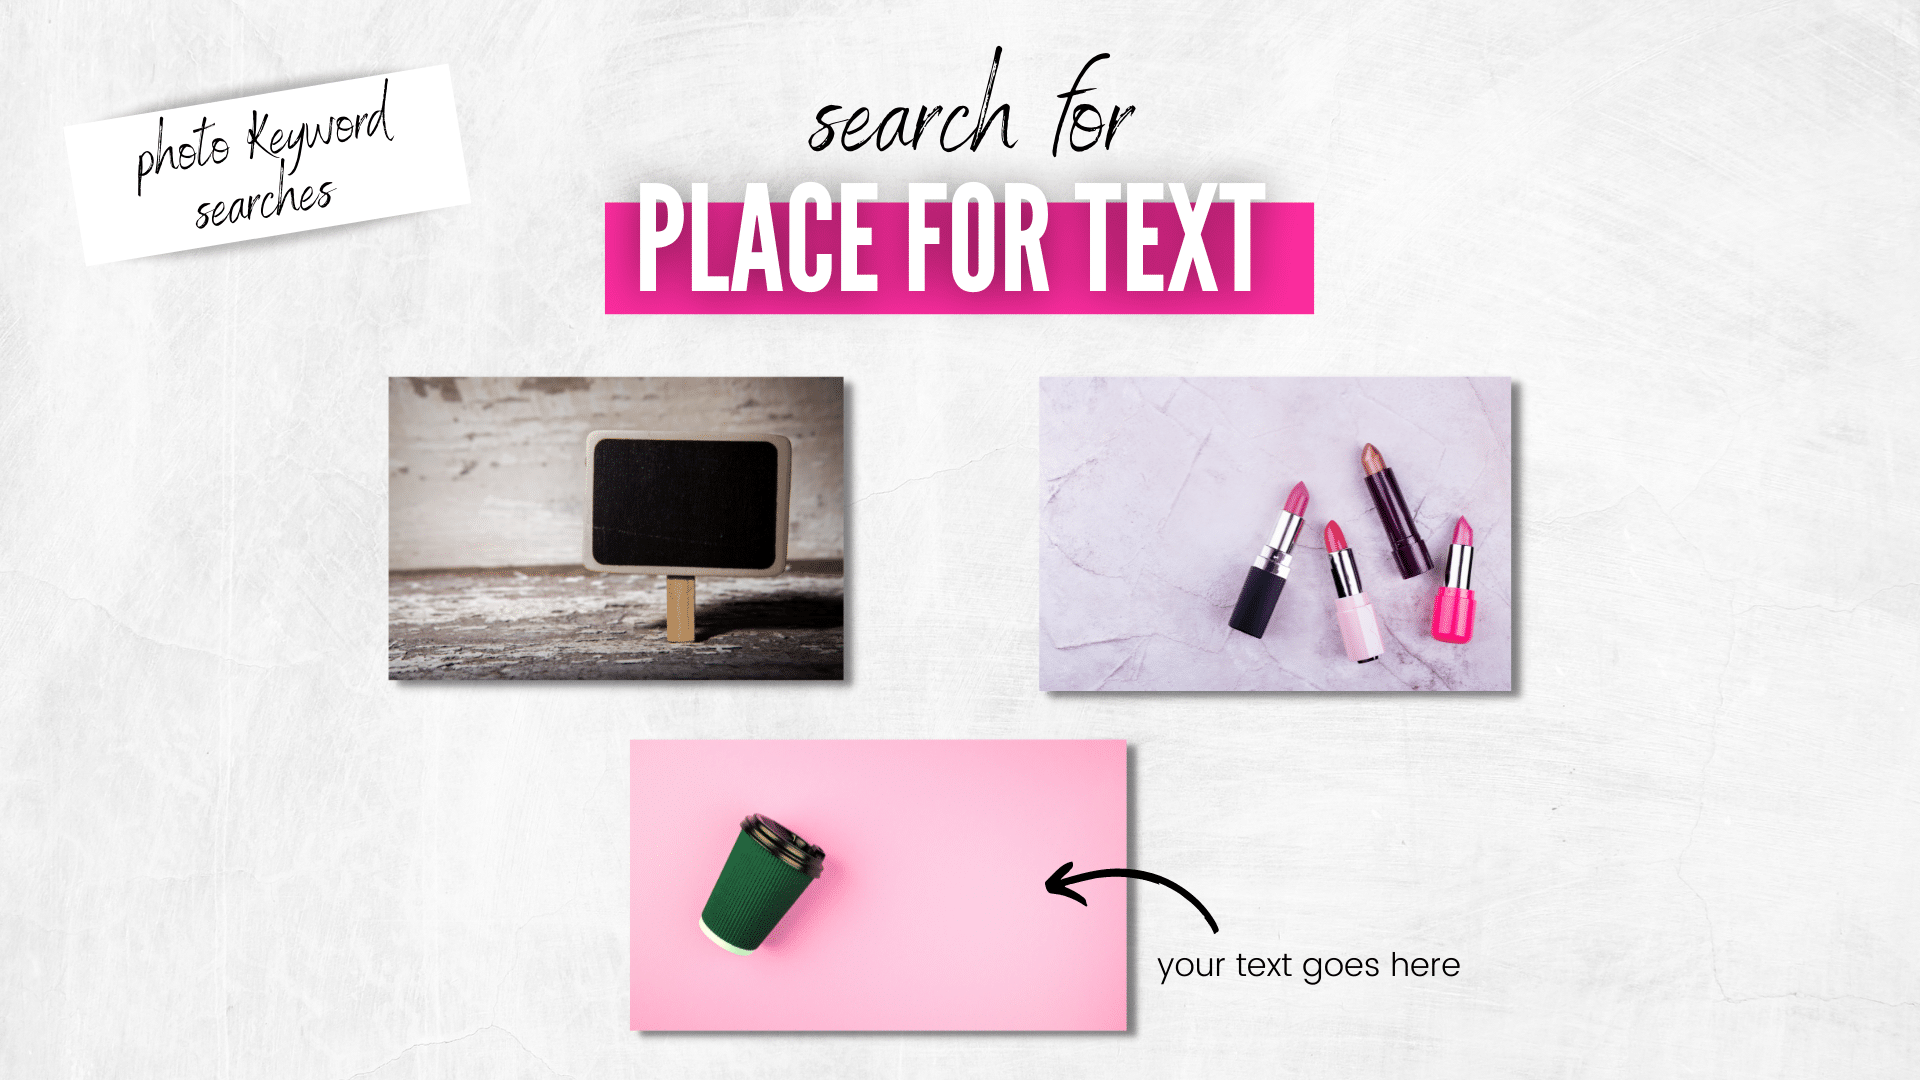
Sarah: Yeah. So we’re going to keep going with this trend because the purpose of this is that these are ready-made photos, as Kelsi said. And I actually saw one done last night, and I sent it to Kelsi. And I wish I could’ve used it, but it was a realtor and I didn’t have their permission. But all you do is search “place for text”, and you’re going to get a ton of ready-made photos, where you can just slap on your logo, add some text, brand it to your own, and it’s really cool. So, if you see on there, you could just type something in that little sign, or you could put your little logo on that coffee cup. So again, this is something that’s so cool, where you can take something that’s already done up and just tweak it to your branding style.
Kelsi: Exactly. We’ve got a couple more keyword options for you to find images like this. Another one is going to be to use the search term “copy space” or “copy space frame”. And it’s going to give you more options like what Sarah’s got on the screen there, where you have framed out spaces, or just a good blank area in that image to add your branding or whatever kind of message you’re trying to relay.

Sarah: And again, I saw this last night and I was so excited because I was like, “This is exactly what I’m talking about!” Somebody just taking these cool ready-made photos and branding them.
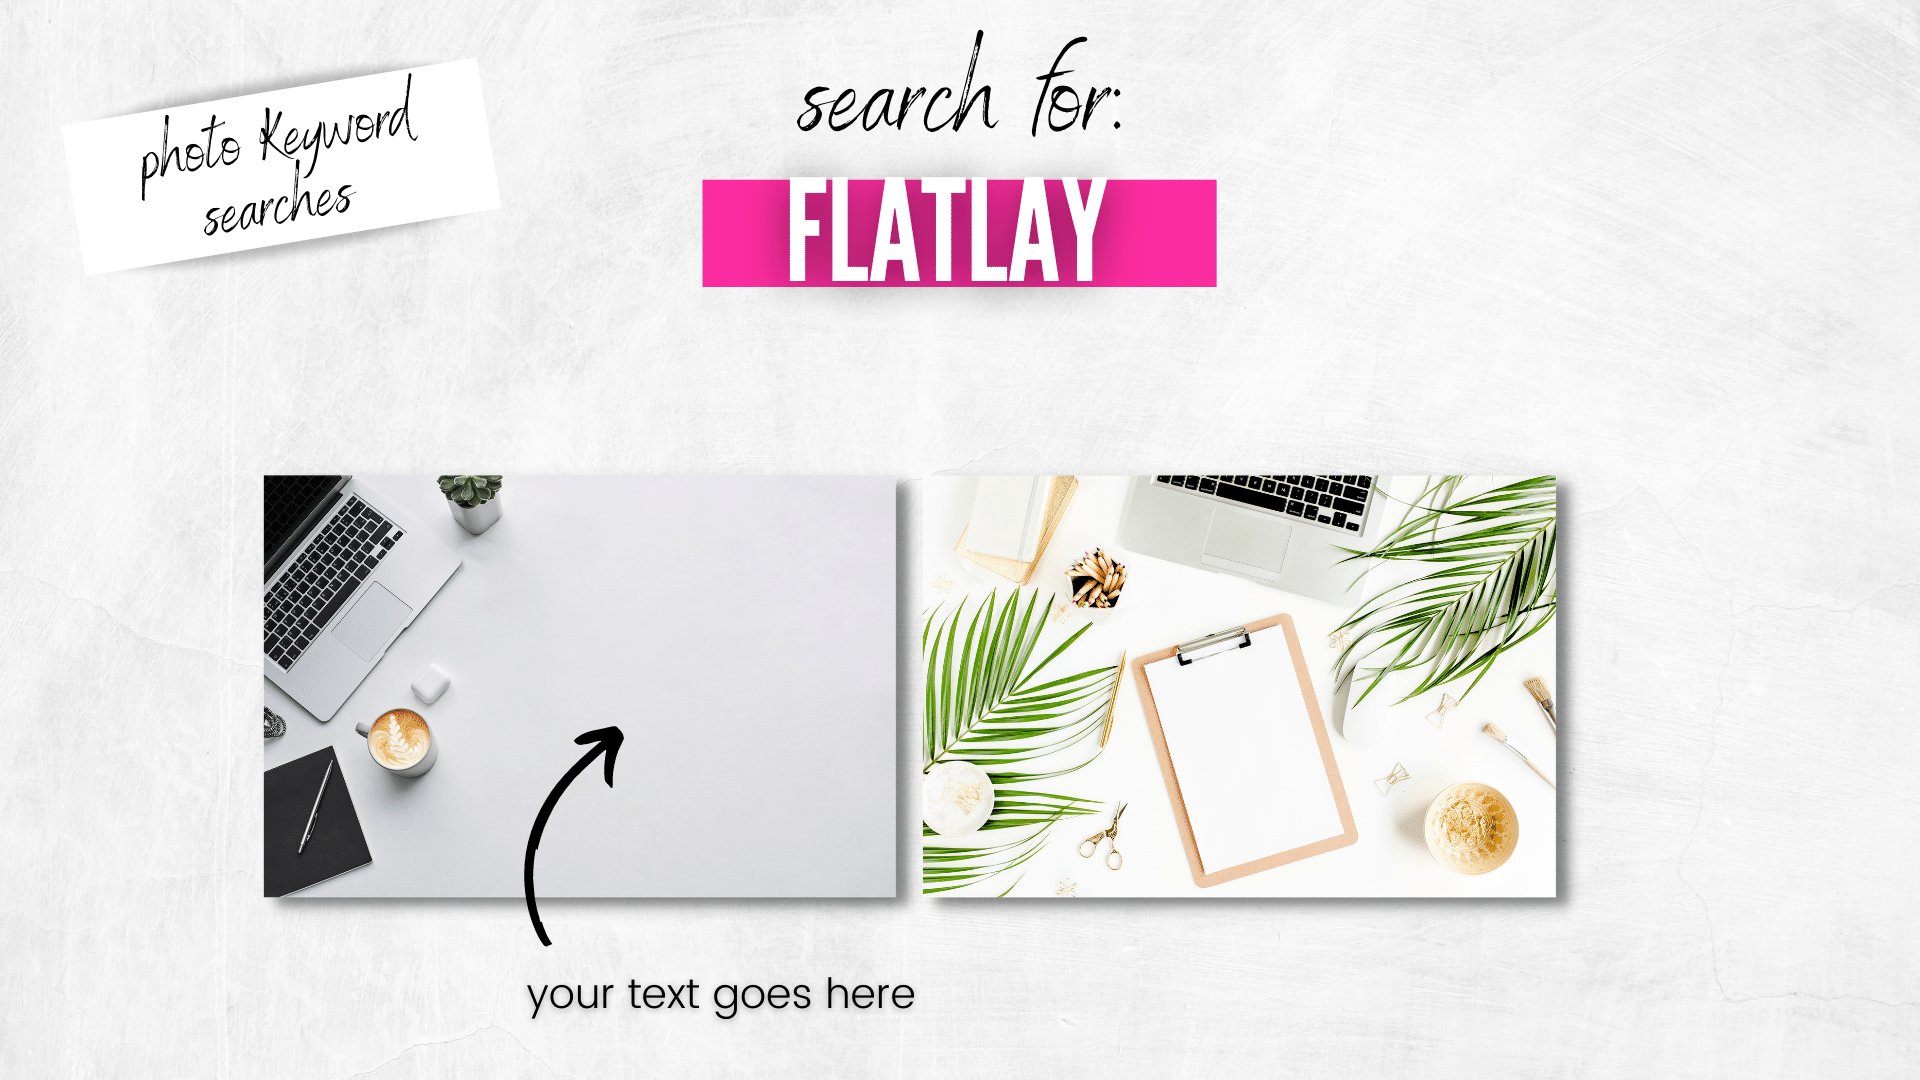
Kelsi: Right. So you showed the PNGs earlier. That’s one method. You could create your own flatlay with those no background PNGs. But if you don’t want to spend the time piecing that together, just use the search term “flatlay”, and you’ll get all of these options that are already pre-made for you that look amazing.
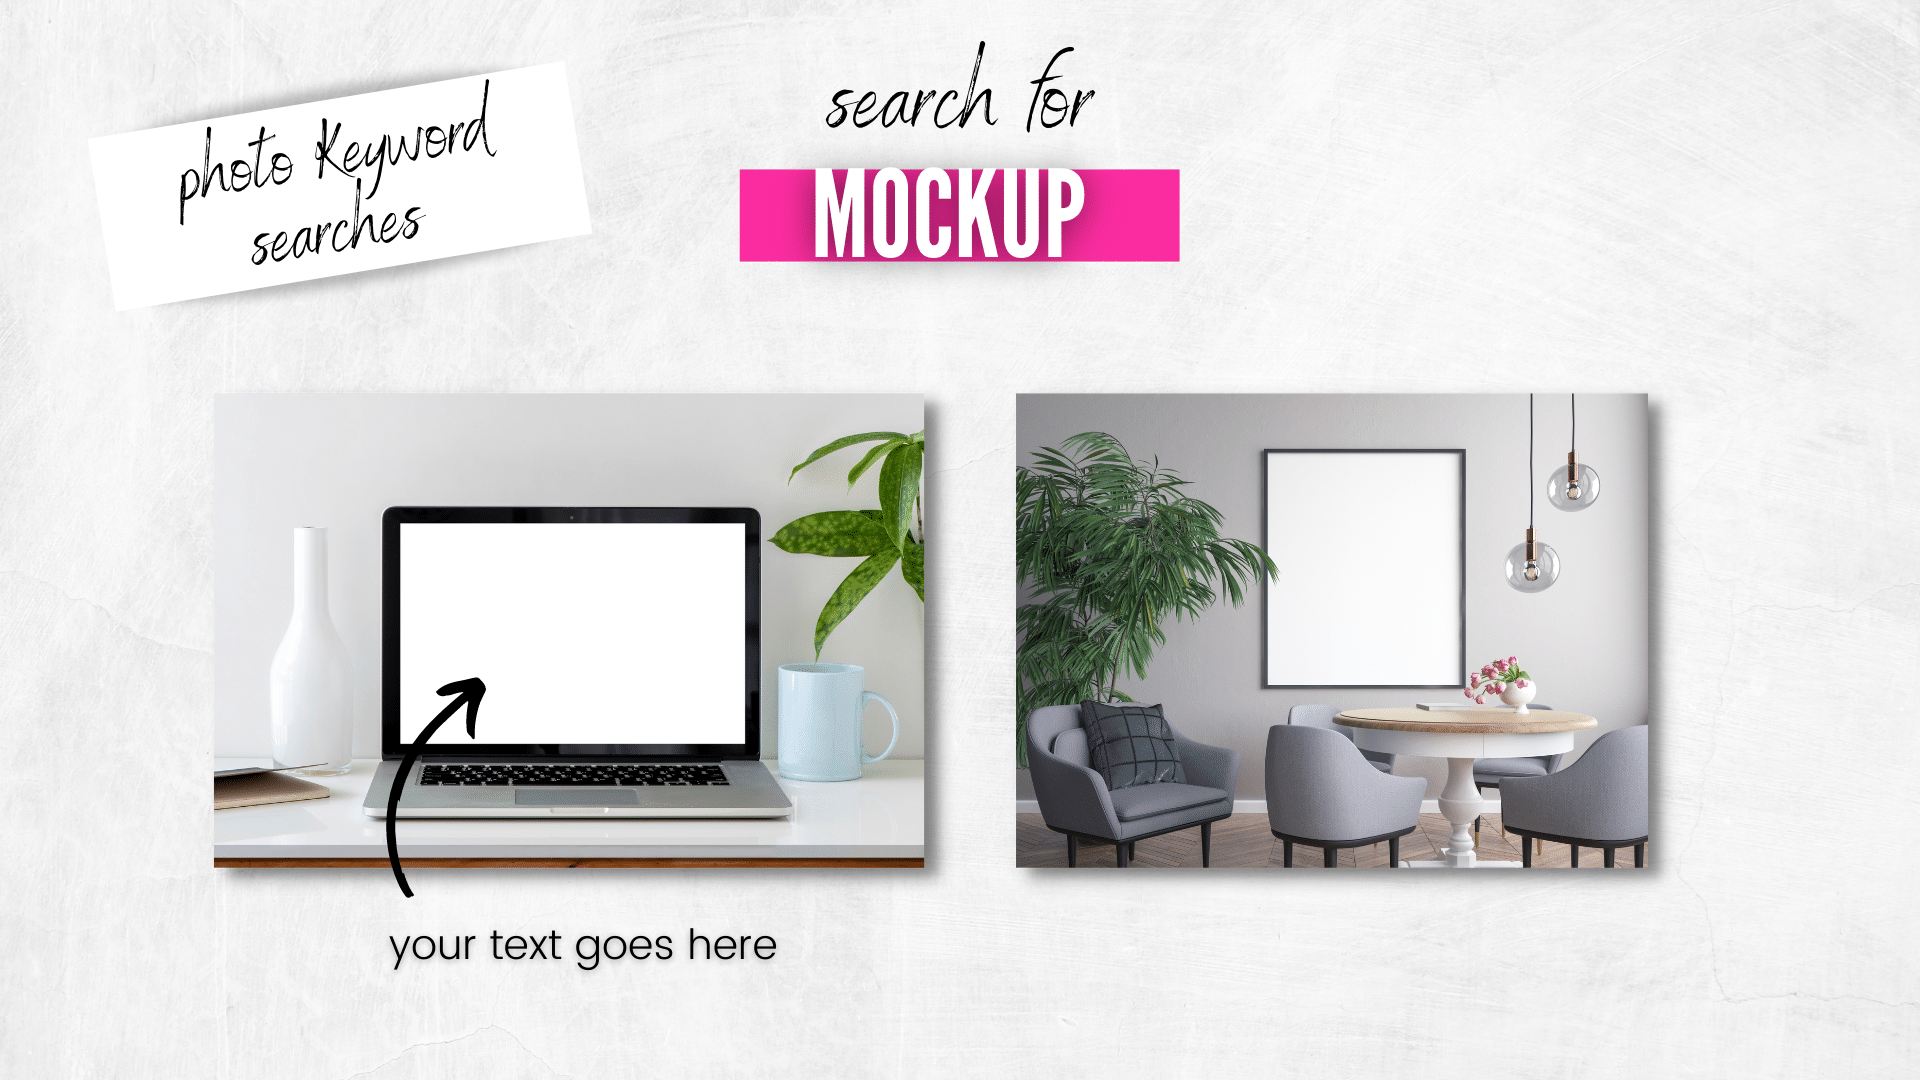
Sarah: Yes, they do. They look amazing. So here’s going to be the last one of this section, and this is called mockup. So finally, if you just search, and all this is if you search in photos and search for “mockup”, you’re going to see a ton of either blank devices, blank boards, I saw blank coffee cups, just all kinds of already done for you options that you can customize. And as Kelsi was saying earlier, you could put a reminder, or a quote, or some sort of piece of advice, or whatever it is. So easy and we love it, so that’s our first little secret. We’ve got five today.
Kelsi: Okay. So our second secret is going to be on animated elements. Now it’s important to understand that when you’re doing any kind of social media marketing, the platforms are going to give you bonus points or brownie points if you incorporate video, and the more video, the better because your audience wants movement. They want to see a video. So, when you add any type of animated element to your Canva, whether it’s an actual graphic that’s animated, an emoji that’s animated, or text that’s animated, it gives you a boost on people’s feeds. So we’re going to go through a couple of options for you. We’ve got five animated effects that will help draw engagement to your content and give you more call-to-action options as well.
Sarah: Exactly. So, let me show you where you find this. You go into your Canva, you’re going to open up a blank project. Go over to elements. I’m going to show you a little video to walk you through it. These are great added boost-engagement, call-to-action type features, and buttons, so here we go. These are five animated elements that we want to try. There’s a ton of them, but we’re doing five. Okay, search for “animated IG white light gradient”, and you get these really cool things, “swipe up”, “new post”. Okay, search for “icon social media SNS gradient react”, so you get those things where it’s like “new post”, “new video”, “swipe up”. Okay, search “animated IG Instagram button”, and that’s those cool things. As Kelsi said, these turn your post into a video. Same thing, “Facebook button”, “animated Facebook button”. And then the last one we want to show you is a GIF, yes, “Facebook black animated social media”. Those are all little cool call-to-actions, too. If you notice, all those search terms start with “animated”, so even if you don’t want to use those, our suggestion would be to go into elements and start your search with “animated”. And you’re going to see all kinds of fun little buttons that you can just add to make your post. And these are good for carousels too. Carousels are where it’s back, to back, to back. You could do something like “new post”, “swipe for more”, all that kind of stuff, so these are another good one, so that’s number two.
Kelsi: Right. It’s really great at grabbing your attention too, making the user want to flip through what you’ve got going on, on your page, so those are great options. Number three is going to be for template searches. So, this is going to be a huge time saver. I like to think of myself as a really good designer, but there are just times when you don’t have the time to spend creating something from scratch. So these template searches are going to help you by tremendously cutting down on time and still making really great-looking Canvas. And Instagram has all kinds of interactive style post features on their stories. And some of them can actually be used on your feed. So we’ve got eight secret search terms for you to use to find great Instagram template options.

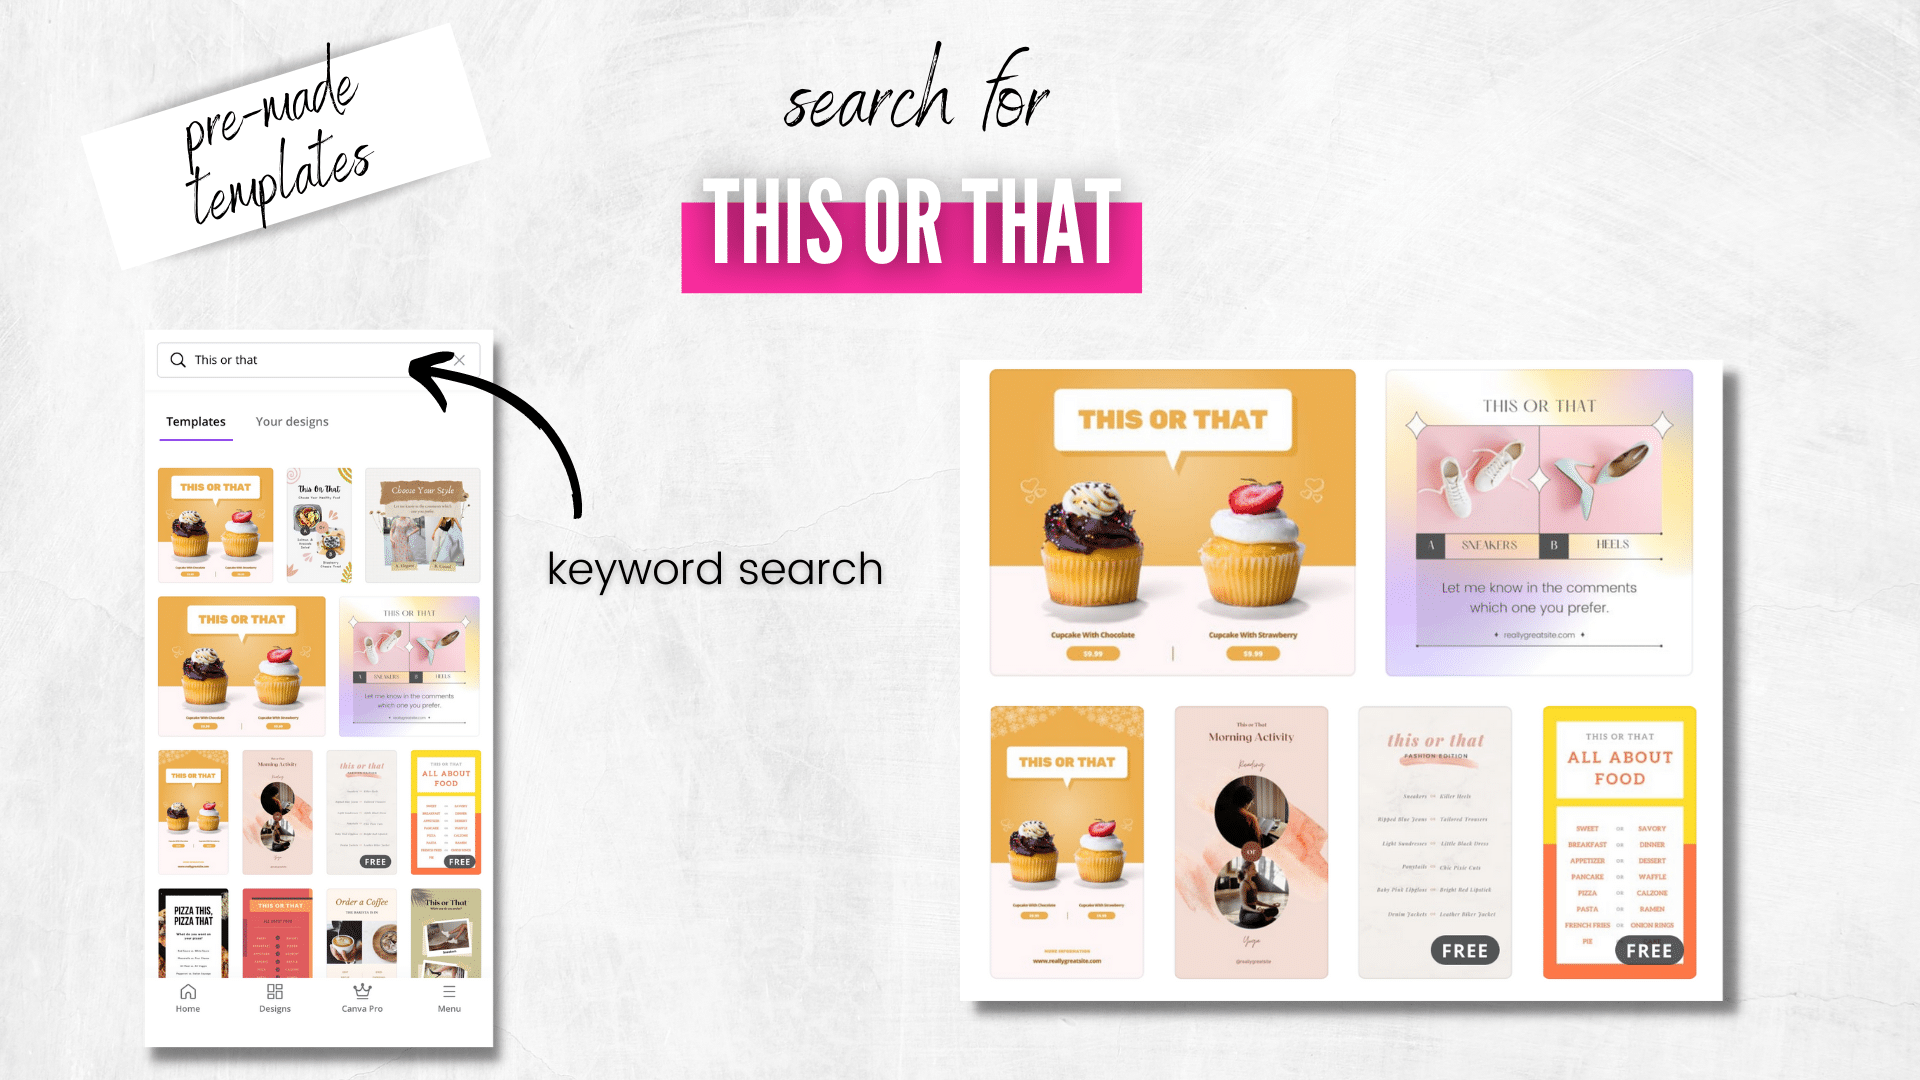
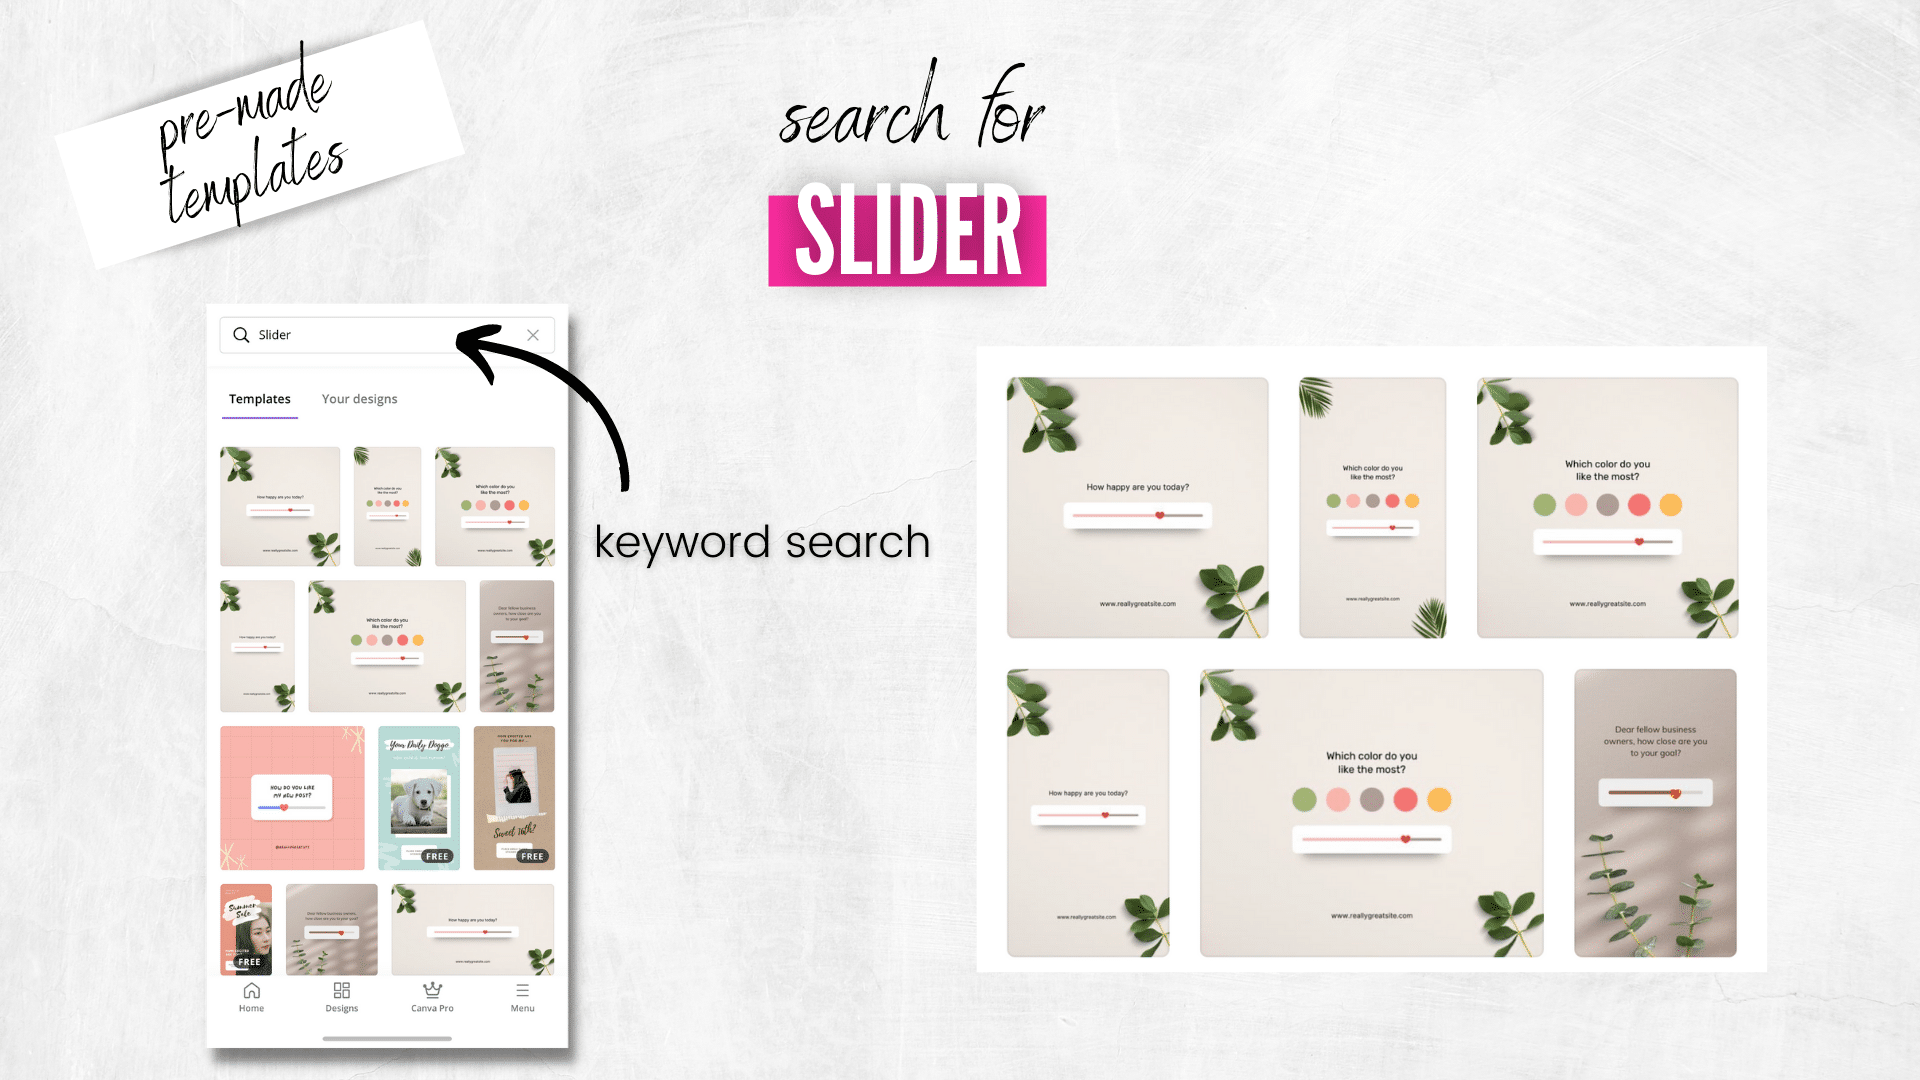
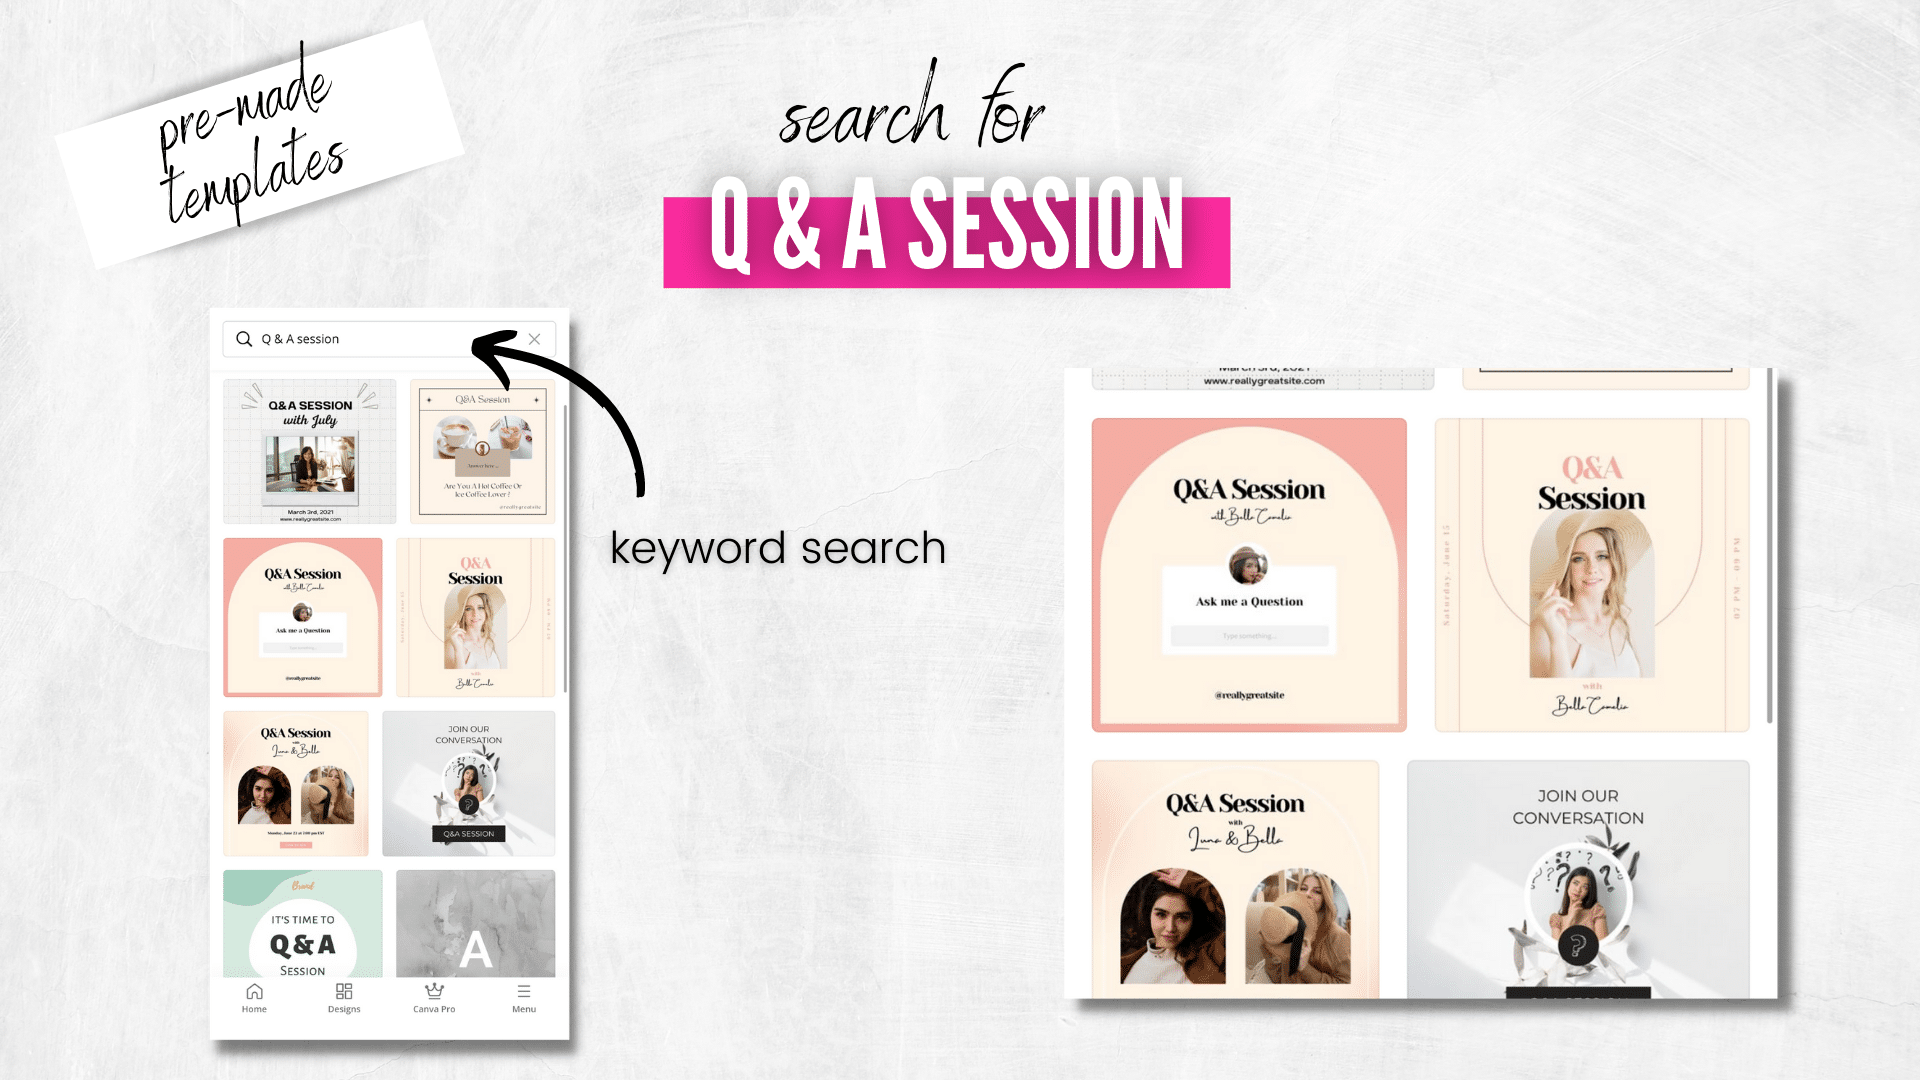
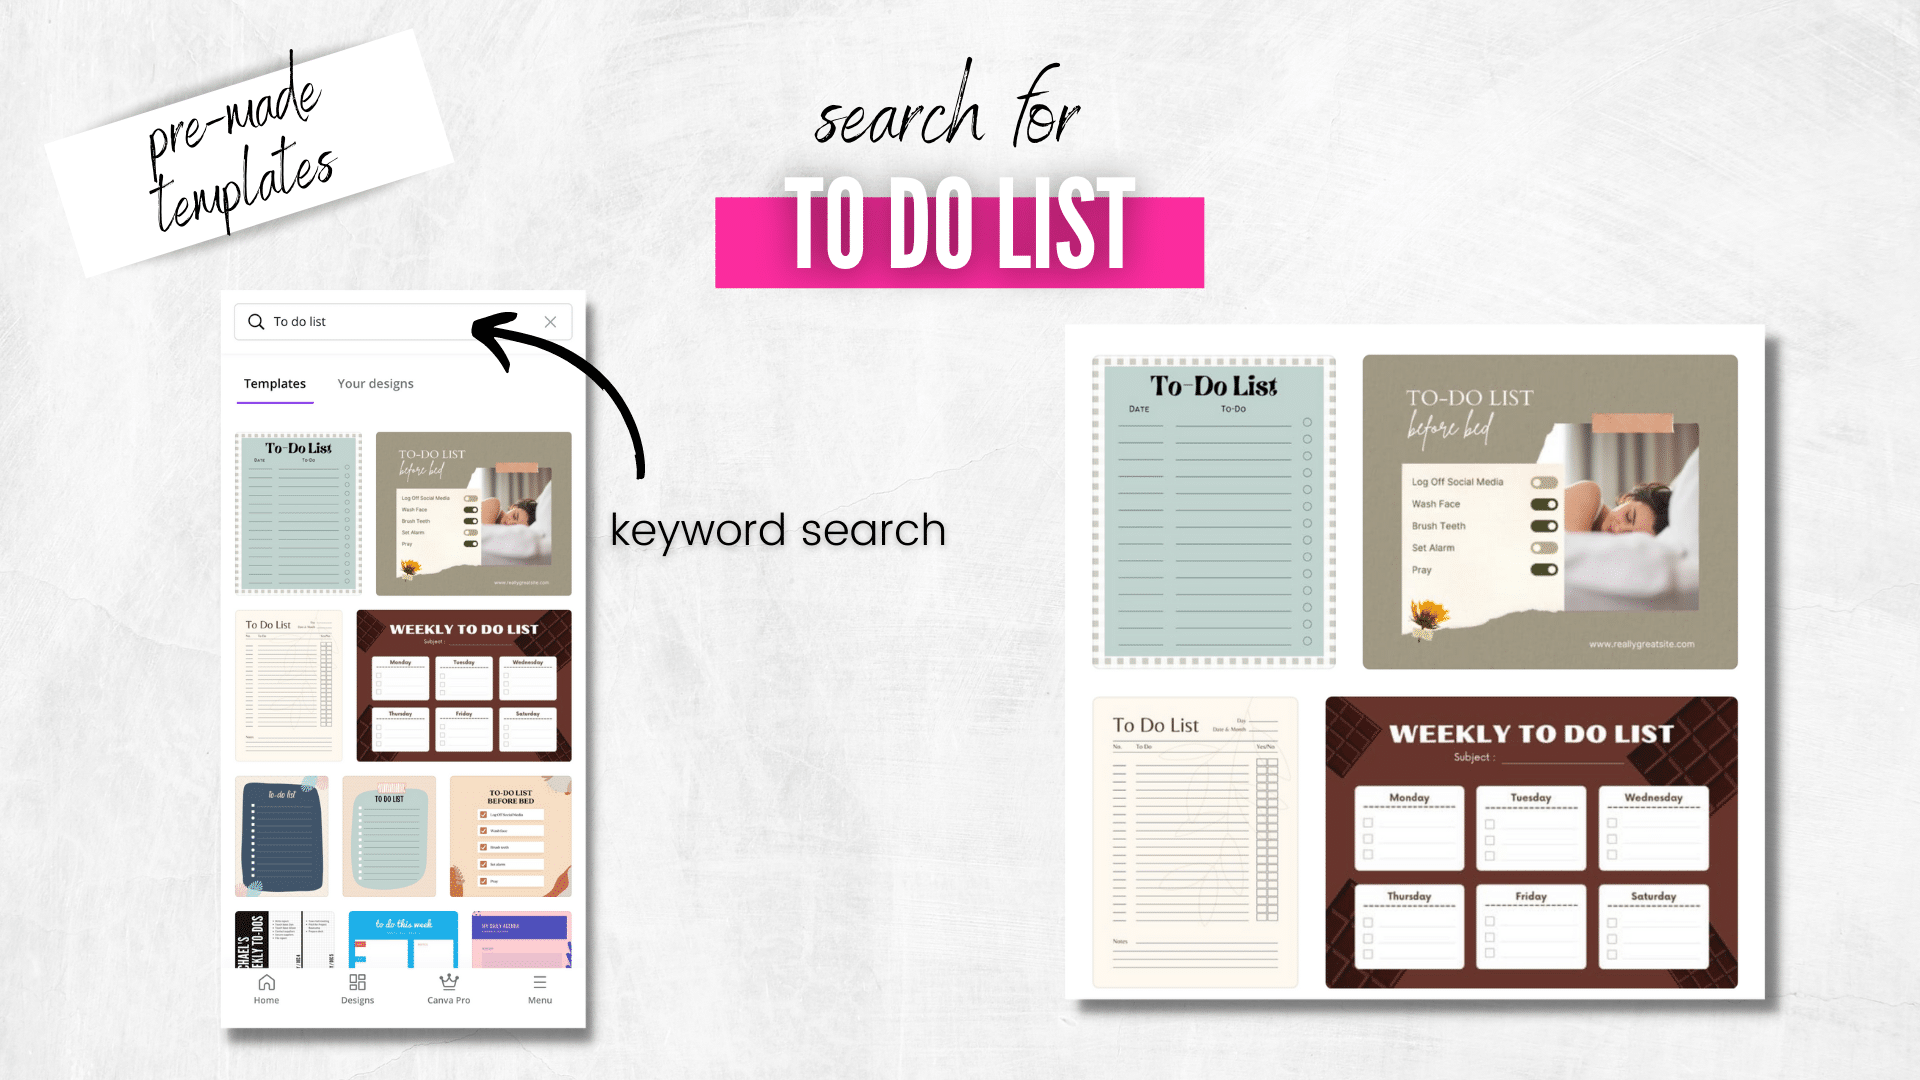
Sarah: Yes, yes. Eight little secrets I want to show you for templates. Let me show you where you can find this. You’re going to go on your homepage in Canva and you’re just going to search right there at the top in Canva. Don’t worry about going to your individual-sized Instagram post or presentation. Just go right there at the top. And the reason why is say that is because it’s going to give you all types of templates that are right there in all kinds of formats, so for Instagram stories or for Instagram posts. So let’s just go right through it. Okay, search for “this or that”. So if you see right here where I’ve got the arrow, I just typed in “this or that”. And then I blew it up on the right, and you can see it’s giving me all kinds of again, ready-made templates that I can just tweak with my colors, or logo, or my own images, whatever it is, but they’re ready-made for you, and they’re awesome. Another one is just search for “slider”. So we know those sliders, we see them all the time on Instagram. These are ready-made that you can go ahead and tweak to your liking, don’t have to worry about starting from scratch, so that’s another amazing one. Okay, number three is “reminder”. And we’ve all seen those, where it looks like just a little text bubble, and these are all those little text bubbles of daily reminder, or quick reminder, or whatever it is. And then another one, just search for “Q and A session”. These again, if you notice what’s great about all these is, they’re all little call-to-action type, where they prompt engagement. They prompt response, so all of those things are great to just help boost that engagement, which is what it’s all about. And again, you get all these awesome little templates that pop up.
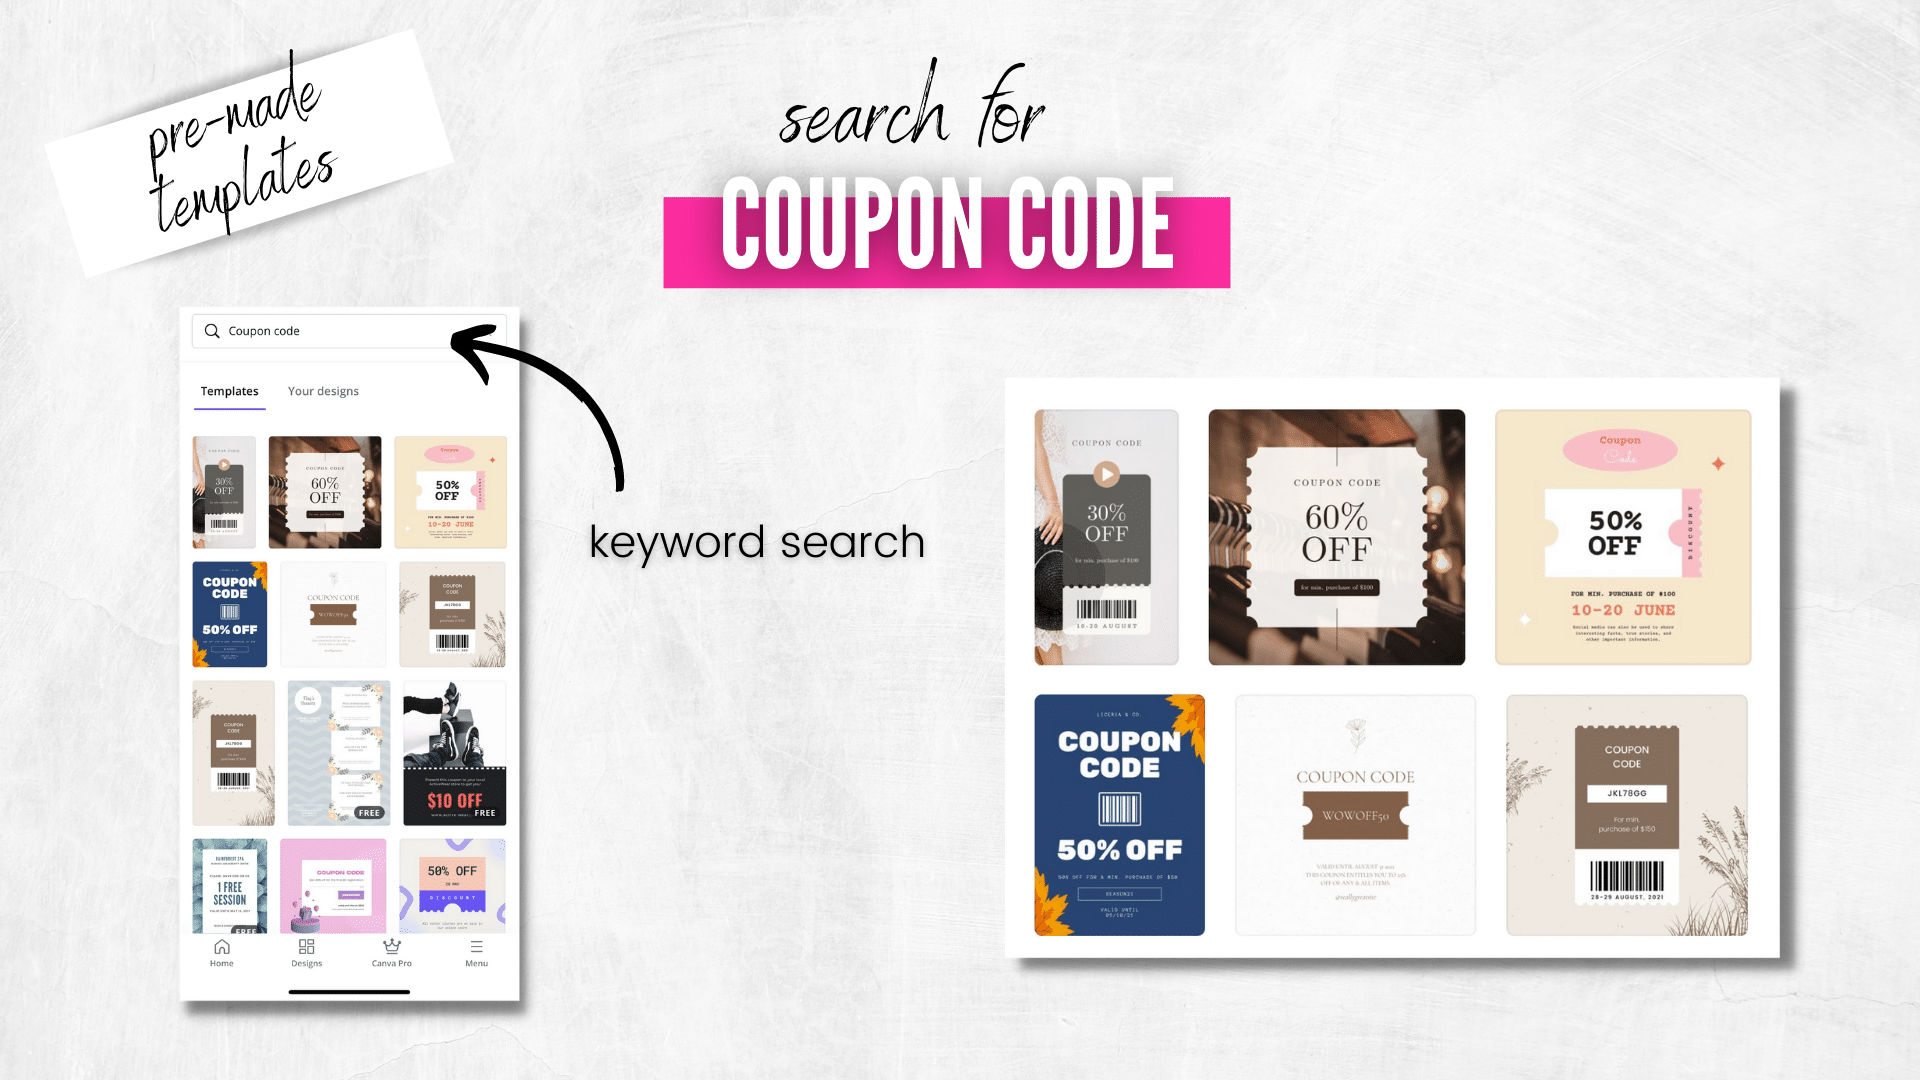
Kelsi: Exactly. And what’s great about Canva is that if you’re trying to create something specifically for Instagram and you find a template that you like, you can actually resize that template, create it how you want, brand it how you want, and then resize it for all of your other channels as well to meet their standards. Number five, we’ve got the search term “to-do list”. So these are great templates just to give you a little way to give a little to-do list for your audience or reminders and things like that as well. And then we’ve got “coupon codes”, which are fantastic for eCommerce businesses. And then we’ve also got “product showcases”, which are also great for retail eCommerce. So you’re just going to type in “coupon code” in the keyword search, or “product showcase” in the search bar as well. And you’re going to get all these great template options. And then last but not least, one of my personal favorites is “mood boards”. So when you use the keyword “mood boards”, you’re going to get templates that look like this. And these are great for real estate agents or designers.
Sarah: I want to go back to these two, which are “coupon code” and “product showcase”. If you are in eCommerce, any type of retail space, whatever it is, if you’ve got a Facebook shop or an Instagram shop, these are perfect for you. You’ve got your template that you can just tweak, swap out your product. And you can just see, you’ve got such amazing, beautiful templates. Get them prepared, load them into your Facebook shop, Instagram shop, add your clickable links for your products and services to go right to your website. So it’s amazing, I mean, I’m sure you’ve seen these. And you’re probably thinking, “Where are these? How do I find these?” And this is it. And again, “coupon code”, use this, tweak it to your brand, and then you can load it into your retail space and add your clickable links, and it’s awesome. And as Kelsi said, these mood boards are great. I’ve seen realtors use this. I’ve seen interior designers use it. I’ve seen it used across the board. People would be like, “Help me decide. What do you think about this layout for this new space or whatever it is?”

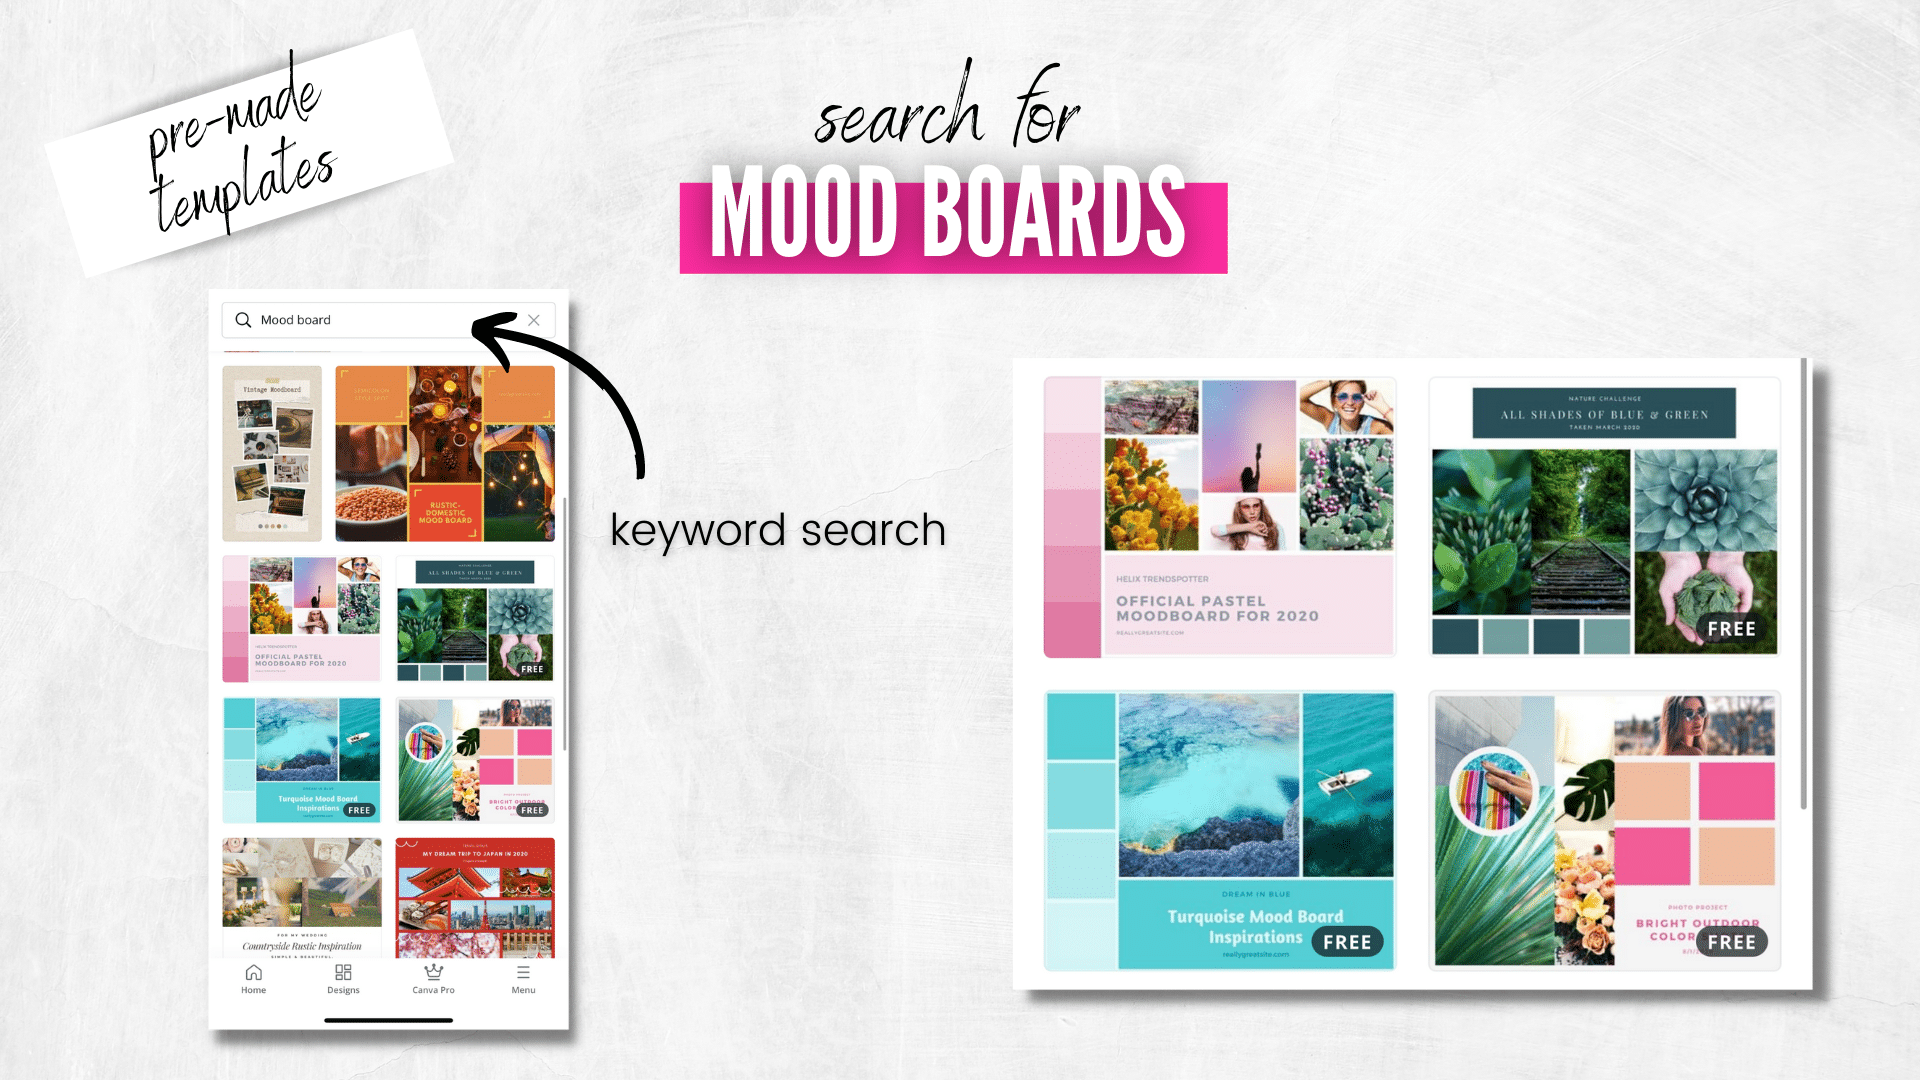
Kelsi: I have seen the mood boards being used to create branding packages as well.
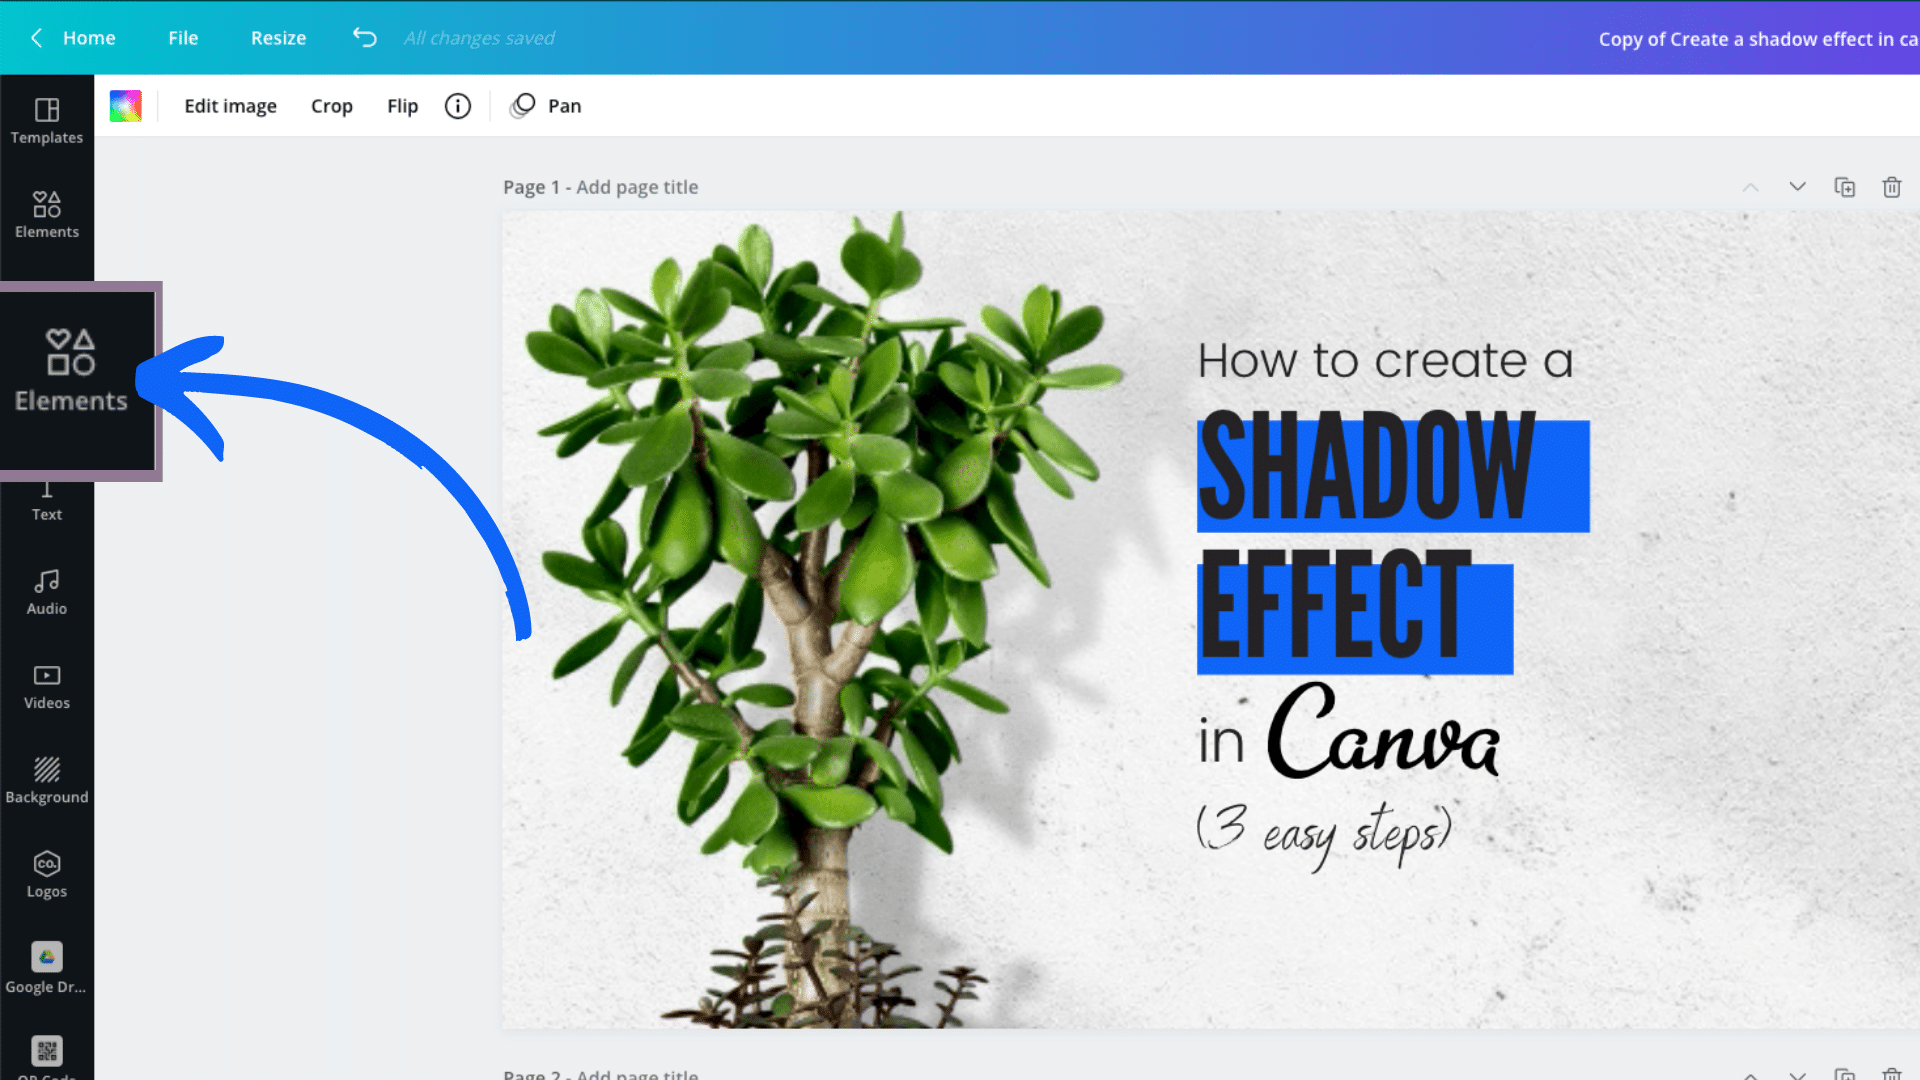
Sarah: Yeah, yeah. Absolutely. We’ve got now we’re moving into effects, special effects, so this is exciting. Okay, so this is going to be … Kelsi’s going to move into this shadow effect feature, how to create a shadow effect. And this, to show you where it is, is right here under edit image. Right there under “edit image”, so you plop in your image, and then we’ve got a little video, and Kelsi’s going to explain exactly how to do this, so here we go.
Kelsi: All right. So when you’re wanting to use the shadow effect feature, you’re just going to need to grab the image that you want to use and drop it into your Canva, your project. And you’re going to go to “edit image”, and scroll down until you find the “shadows” section, and then hit select all. Now, you can actually change out the different image effects until you find the one that you like the best.
Sarah: And you can see it adds that shadow on the background, and it changes how it looks, which that’s one’s my favorite with the backdrop.
Kelsi: It looks so real.
Sarah: It does, it does. I’m obsessed with this feature because it makes everything look so much cooler when you add that depth to it and that 3D element to it, so yeah. Should we show that one more time or not?
Kelsi: Sure, go ahead.
Sarah: I think so. So this is how to create a shadow effect again. This is in “edit image”. So as Kelsi said, you’re going to drop your image in there. And again, you can search that with plant PNG is the secret we told you before. And it’s going to add all these shadow effects to it. Now one thing to note is this may or may not be on yours, but it’s an added feature if you have Pro, Canva Pro. All you have to do is just add it and download it for free. But as you can see, it’s just going to add, there’s backdrop shadow you can see to the leaves on the wall. So, now we’re going to move on to another area. This is the same thing about special effects that you can add to your image. And we’re going to talk about frames. We’re going to talk about smart mockups, and we’re going to talk about background remover. So before your head spins and you’re like, “What the heck does that mean?” I’m going to show you this. This is in the same effects area, so there are three more things. There’s a ton of them, but we’re just going to go through three right here. These are great, great tools. So again, it’s best demonstrated through video, so here we go.
Sarah: Here’s frames, so I just took an image and I dragged it in here. Then I hit edit image. And from there, so all that is, I just took a screenshot and dropped it in there. So what this is called is “frames”. It’s right there at the top because I recently used it. But again, you’re just going to scroll down, scroll down, scroll down until you see frames. And then you’re going to select all. What frames do is it takes that image and it drops it into, I’m going to demonstrate it with a phone, so just drops your same image into a phone, and there you go.
Kelsi: How easy is that?
Sarah: It’s so easy. It’s so easy. So that’s frames. Now we’re going to talk about smart mockups. We use smart mockups all the time. So same kind of concept. I’m going to take an image and I’m going to drop it in here just for purposes of speed, and just kind of grab the same image, and I’m going to crop it and make it a little bit bigger. And the same thing, so let’s say I want to drop this into another picture, that’s what smart mockups are. It’s going to take that, you’re going to hit edit image, the same thing. You’re going to go all the way down to smart mockups, which you can see there at the top. But because we want to show you where to find it, you’re going to keep going. There are smart mockups, see all. And look at this. This is so cool. This is all these areas where your image is, that blue space, your image is going to appear right in there, so I’m just going to randomly pick one. I like that little laptop right there. I click on it and it’s going to drop my image into this smart mockup image. And how cool is that?
Kelsi: Bam!
Sarah: Bam. Last one, background remover, this one’s awesome. So see, I’ve got lipstick. I had Lisa Phillips with Mary Kay on my mind when I was doing this. I’ve got my image, but I don’t want that pink background. I want just the lipstick because I want to do my own thing with the lipstick. So, I’m going to again go to “edit image”, it’s right there at the top, “background remover”. And that’s it, I just click background remover and it’s going to eliminate that background for me, and that’s it. Voila!
Kelsi: Voila.
Sarah: And then you just save it. So easy. That’s like we talked about earlier, you’ve got the PNG images. But what if you see an image and you like everything about it, you just don’t want the background? And this is an easy fix for that.
Kelsi: Exactly. All right, number five, we’re going to talk about video editing. So, Canva makes it really easy to create your own custom videos in their space. You can upload your own video clips and then make edits to that, trim it how you want, add those animated features and slide transitions, and then you can even add music as well.
Sarah: Yes. So I’m going to try to get this a little … All right, so Canva has had this video editor feature for a while, but they’ve just added some new elements to it, so that’s what I want to show you. I was like, “Hey, I want to create my own little outro video for these lives. I want to create my own outro video.” So what I did is I created, to save time, I created all these little slides. And each one of these slides is going to be like a video clip essentially. And so you can see I’ve got all these little graphics. I decided to add some of these X’s in here, so if I wanted to take this X and add it, and do all that kind of fun stuff. And if you see that little “thanks”, that is glowing right there, that’s another edit that’s under effects right here. Or I can do all these fun things like I hit neon, so now it’s glowing. These two things, you’re going to see when this is done. These are actually two video clips. So what I did, and this is a new feature on Canva. Canva used to have a restriction where you could only do one video uploaded per slide. But what they’ve done now is I can actually have two, or there, or more actual videos. So this is one of our previous Marketing Mixes, I took it, as you can see, if I click on it, you can see it’s at five seconds. So what I did is, I mean, here’s the entire video. And what I did is I just clipped five seconds worth of it and dropped it in, so it trimmed it for us. And then I added all these other things, so again, I’ve got my little graphics, I’ve got all this. Two more things I want to show you. The first thing that Canva just added is that not only if I want to hit animate right here, not only can I do page animation, so what that means is that the actual page has a transition of how it comes in and how it comes out. So I can do a “block” transition, I can do a “breathe” style, it’s all these really cool, as you can see. I can do “pan”. I could do a photo zoom. It’s all this just really, really, really neat stuff. So then what if I want to do this right here? This is text animation. So you saw that I had page animations over here. This is text animation. So, let’s say I want to do “typewriter”. I want to type out, or I want to do a “burst”, like a big “thanks for watching”. And I can actually do it for each one of these blocks and get all these cool little animations that go through. So again, it’s really cool.
Kelsi: So, when you’re doing the page animations, you would need to click outside of the Canva. Is that correct?
Sarah: Yeah. I’m glad you brought that up, Kelsi. So, as you see right here when I click on the actual black space of this and I hit “animate”, it’s going to do my page animation. So you have to click on the element. And when I say element, I mean either the background, or the video, or the text, and go to your animation feature over here and it’s going to show you. So, that’s page and that’s text, separately. But wait, there’s more! If I click on elements, which are these little graphics that I have here, I can also animate those, so those can come in and tumble in, or do all sorts of stuff.
Kelsi: Wow. So, you can actually choose an element that is animated, or you can choose one that’s not necessarily animated, but then make it animated through that feature.
Sarah: Exactly. I’m so glad you said that. Exactly. Now, if you decide to group all this together, if I want to group it all as one, you can do that and it’ll all come in at once. If you don’t group it, you can have each one come in on its own. Again, so I just went in here, I added my little fun graphics. I added all of the things that I wanted to add. I love it. And then I’m like, “Well, you know what, I want to add some music to it.” So you can go over here under audio, and there’s a lot of ready for you to use songs. And if you find one you like, all you have to do is grab it and drag and drop it. And you can see I’ve already chosen a song right here called “Your Gain”. And then when I do tap on that, I can actually edit which part of the entire song I wanted to play. And then one last thing I want to show you before I show you the final result is “video”. So you have two things when you create these videos in Canva. You can upload your own stuff, so you can upload your own videos. Or you can use any of their video templates that are here. And another cool thing, as you see right here, record yourself, you can actually record yourself and your voice as this video is going, and you can do either an audio record or a video record. So it’s completely solved the problem of making a complete video.
Kelsi: I’m not going to lie. I didn’t know that record yourself was there. I use this tool every day, and new things pop up all the time.
Sarah: Well, if you don’t know, I mean … You know what I mean? It’s like I said, they don’t make these big announcements all the time. So you saw all that, now let’s see what the final results is of what I put together. And again, this is just to show you how you can make your own video in Canva, so here we go.
Kelsi: I like that.
Sarah: Pretty cool. Right? All through Canva! And you should watch it one more time because I want you to notice in the very beginning the point that I was saying that you could actually have more than one video playing at the same time.
Kelsi: I love it.
Sarah: It’s just using all those animated features that we were talking about like text animation, page animation, so yeah.
Kelsi: Impressive. I love it.
Sarah: I’m excited about it. Whenever I get excited about it, I’m like, “I can’t keep this to myself!”
Kelsi: I’m glad! Well, before we wrap up the show, I do want to give another little special Canva tip here. So for anybody out there that is creating their own Instagram stories, reels, or uploading their TikTok videos to Instagram, we have a strong recommendation for you. And that is to actually download the Canva app. You can pull your images and your videos directly from your phone into that app, add these bells and whistles we’ve been going through, and then actually post directly to your channels from Canva. And we just feel like that’s a great way to streamline the process because creating content for all these different channels can be really cumbersome. They all have their own standards, or what they want you to use in your posts. So dragging all of your content into Canva allows you to kind of streamline everything. And then when you connect to your account to Canva, it’s just a little click of the button, and then it’s live, it’s on your page.
Sarah: Yes. That’s such a good tip, Kelsi. So yeah, we definitely recommend downloading the app so that if you’re doing reels, or stories, or any of that, it’s so much easier to post from Canva.
Kelsi: Lisa had a question. She wanted to know if you need the paid account to have all the features we went through today.
Sarah: So, we have Pro, we have Canva Pro, and so we’re able to do all of those things. Now with the free account, you have some of those features, but they’re limited. Because I don’t have the free account, I can’t with certainty tell you which ones of those you’re limited to. I do know you do have a lot, but you may not have all the access to all of those images. You’ll see the little Pro button where it’ll say, “You can access this with your Pro account.” So for us, I recommend the Pro. I mean, it’s so much more bang for your buck. And we’re going to keep updating with new finds that we have. And we’ll always put them out there. I was thinking of more last night, and then I’m like, “I’ve got to stop.”
Kelsi: We’ve got 30 minutes, Sarah.
Sarah: 30-minute show. But we really appreciate you all watching. I really hope that you got some useful information from this. As always, we’re here to help you strategize and help you with social media any way we can. But yeah, please let us know if this was helpful. And if there is anything more that we can offer, if there are any ideas or questions that you have, we’d love to hear it for upcoming shows. And Kelsi, thank you for joining me this morning. I totally threw you in on this last minute, and I appreciate it.
Kelsi: Oh, no problem. It was a great segment. You did a great job putting all of it together.
Sarah: Oh, thank you. I appreciate your help. So all right, that’s a wrap for us. And next week, we’re going to have another great show, so tune in for that. See you.